


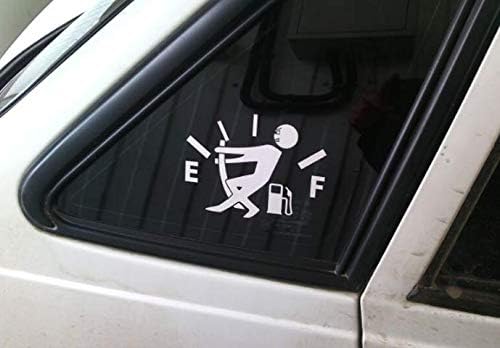


Funny Car Sticker Pull Fuel Tank Pointer Vinyl Decal Decoration Fuel Tank Cap Wrap Decor (2 Pcs- White)
See current price
Check the current price and availability on Amazon.com.
View on AmazonAffiliate link — we may earn a commission at no extra cost to you. Learn more
- Color
- 2 Pcs- White
- Item Dimensions LxWxH
- 7 x 4.5 x 0.1 inches
- Surface Recommendation
- Window
- Room Type
- Car Window Glass Door
Key features
- Decorate your loved car with this funny car sticker.Give your car a funny and fashionable look
- Clean the surface where the decal will be installed. Slowly removed the paper backing making sure that your decal remains stuck to the clear transfer tape
- 2 Pcs -Silver tone.
Specifications
| Brand | Everyday |
|---|---|
| Color | 2 Pcs- White |
| Item Dimensions LxWxH | 7 x 4.5 x 0.1 inches |
| Surface Recommendation | Window |
| Room Type | Car Window Glass Door |
| Material | Vinyl, Paper |
| Theme | Automobile |
| Number of Pieces | 2 |
| Age Range (Description) | Adult |
| Installation Type | Self-Adhesive |
| Reusability | Single Use |
| Pattern | Letter |
| Shape | Irregular |
| Unit Count | 2.0 Count |
| Manufacturer | Everyday |
| Item Weight | 0.704 ounces |
| Product Dimensions | 7 x 4.5 x 0.1 inches |
| ASIN | B07W52TMWS |
About this product
1 Clean the surface where the decal will be installed 2 Slowly removed the paper backing making sure that your decal remains stuck to the clear transfer tape. If part of your decal lifts up with the backing, press the paper backing back down against it until it stays stuck to the transfer tape. 3 Once your decal is peeled away from the backing, line up & position your decal against the surface to which it will be applied. 4 Use a credit card, squegee, or something similar to smooth down your decal, making sure that it is completely stuck to the surface. 5 Carefully & Slowly, remove the transfer tape from your decal, making sure that your decal is stuck to the surface. If you see part of the decal does not release from the transfer tape, press it back down to the surface and repeat the process.
Similar products

UTVDistribution
UTVDistribution Seat Belt Harness Override Clip Bypass Plug Aftermarket Parts Compatible with Can-Am & Polaris Models RZR X3 +
See current price
UTVDistribution
UTVDistribution Seat Belt Harness Override Clip Bypass Plug Aftermarket Parts Compatible with Can-Am & Polaris Models RZR X3 +
See current price

See current price